This post was last updated on January 25th, 2017 at 06:57 am
Many small business owners choose WordPress, to power their website’s because of its flexibility. WordPress is relatively straightforward and easy to install however sometime many users, as most beginners do, end up installing WordPress in a subdirectory instead of the root directory (e.g. http://www.exampledomain.com/subdirectory/ instead of http://www.exampledomain.com). So if you accidentally installed WordPress in a subdirectory (or maybe want to move WordPress to a subdirectory) but don’t want to impede usability and user experience of your site (i.e. visiting your website with “http://exampledomain.com”), then you’re in the right place.
In this article, I will cover two scenarios: when WordPress site is installed in its own directory and when moving an existing WordPress install from the root directory to a subdirectory. For both scenarios, I will show “how to get rid of /subdirectory/ from your site’s URL” without affecting the user experience. Your visitors will not even know that files are stored in a subdirectory.
mod_rewrite module is enabled, and you should have some knowledge on .htaccess and file permissions.When WordPress Installed in its Own Directory
Step 1: Fresh WordPress install in a subdirectory
Let’s say you’ve downloaded the latest stable release of WordPress and install it in a subfolder named “wordpress”. So the site is accessible using this URL (http://yourdomain.com/wordpress). Now continue with the following steps.
Step 2: Creating The .htaccess File
Login to the backend of your new WordPress site and navigate to Settings > Permalinks screen and set a proper permalink structure. Once you click “Save Changes” button, a .htaccess file will be generated automatically, which used for hardening site security, URL redirection, URL shortening, etc. Sometimes this .htaccess file doesn’t create or updated automatically. Then, you should check if WordPress has the write permission. If not setting the file permissions to 644 is recommended. If the issue persists, you should contact hosting provider to confirm the mod_rewrite module is enabled.
Step 3: Changing The Site Address
Now, navigate to Settings > General in the backend and look for the WordPress Address (URL) and Site Address (URL) fields. By default, these two fields come with the same value. WordPress Address is the address of the folder where you’ve installed WordPress, and the Site Address is your website’s URL.
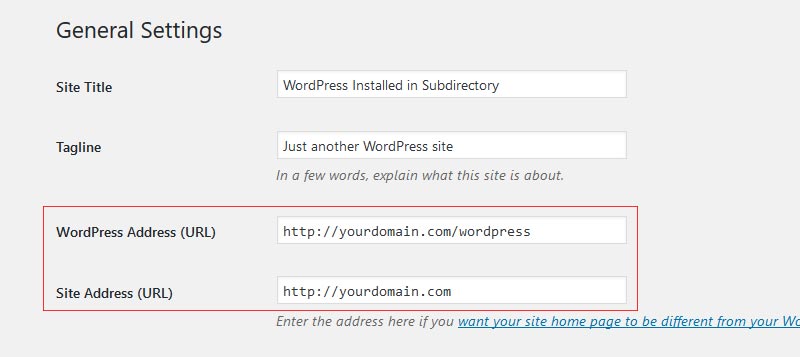
Save the settings you just edited, but don’t refresh your website until the following step 4 is completed.
Step 4: Finally, Dealing with index.php and .htaccess
Now, login to your hosting by using cPanel or a FTP client like FileZilla (FREE). Locate the index.php file and .htaccess file in the subdirectory (/wordpress in this example), and then copy and paste them to the domain root directory (these files should always be together in the directory).
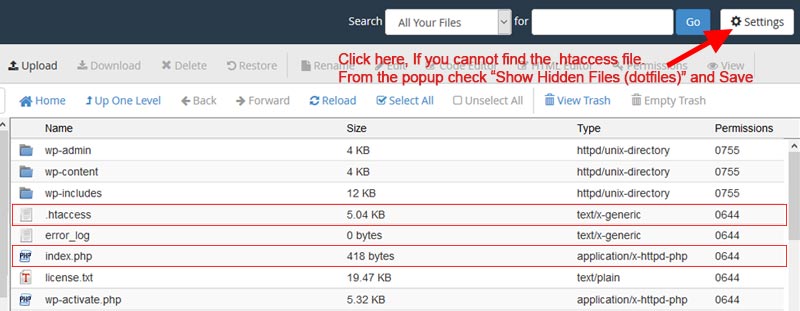
After copying the files, Open the index.php in the root directory of your domain in a plain text editor and replace the following line of code:
require( dirname( __FILE__ ) . '/wp-blog-header.php' );Find and Replace the above line with the following one. Note that “wordpress” is the name of your own subdirectory.
require( dirname( __FILE__ ) . '/wordpress/wp-blog-header.php' );Finally, save the file, that’s all you need to do. Now type the Site Address (“http://yourdomain.com”) in a browser and access your website.
When moving an existing WordPress install from the root directory to a subdirectory
if you’ve come this far then you might decide to clean your root directory by moving your existing WordPress site from the domain root to a subfolder/subdirectory. So let’s continue with the following steps.
Step 1: A complete backup of your WordPress site
The most important step, make sure you’ve taken a complete backup of your site because the next steps involve updating database tables, it’s better to be safe than sorry.
Step 2: Create a subdirectory and change the Address
Since we will move WordPress to a subdirectory, the first task in this step is to create a subdirectory in the root directory. You can use cPanel or a FTP client. Subdirectory name can be anything you want, and for this example, I used “/wordpress”( directory in which WordPress files will be stored, after moving from root directory).
After the subdirectory is created, login to the backend of your site and navigate to Settings > General and change the URL values. Set WordPress Address to the subdirectory (/wordpress) URL and Site Address remains unchanged.
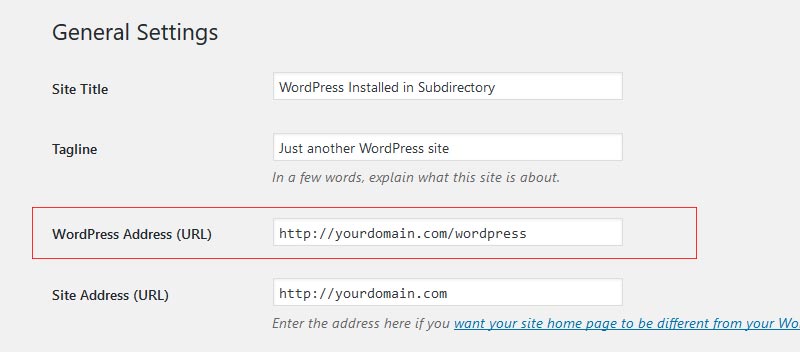
Just like before, don’t refresh your website until the following steps are completed.
Step 3: Moving files to the subdirectory and modify index.php
Next, move the all WordPress install files from the root directory to the “/wordpress” folder, make sure to keep a copy of the index.php and .htaccess files in the root. Then from the root directory open the index.php file and replace the following line:
require( dirname( __FILE__ ) . '/wp-blog-header.php' );Find and Replace the above line with the following one. Note that “wordpress” is the name of the subdirectory.
require( dirname( __FILE__ ) . '/wordpress/wp-blog-header.php' );Click Save Button. With these changes in place, WordPress will look for wp-blog-header.php in its new location.
Step 4: Finally Update the Permalink Structure
Go to “http://yourdomain.com/wordpress/wp-admin” (“wordpress” refers to the name of the subdirectory) and once logged in, navigate to Settings > Permalinks to set up the permalink structure. During this process, the .htaccess file will be updated automatically.
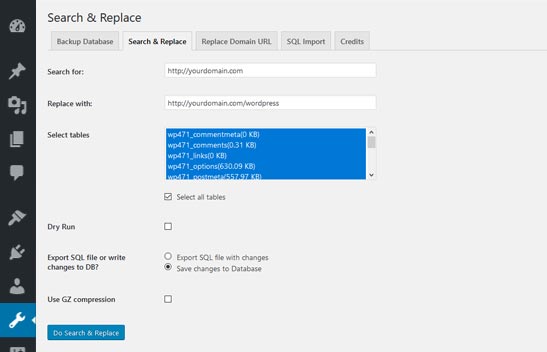
Lastly, review the internal links in your menus and post content. To change menu links navigate to Appearance > Menus page. but changing links in existing posts are little tricky, it requires running queries from database, but the easy way is to use a plugin to do the same.
Using the Search & Replace plugin, you can comfortably search and replace strings in WordPress. Just go to Tools > Search & Replace in the backend of your site once you’re installed and activated the plugin.


1 Comment
You can post comments in this post.
Your means of describing everything in this paragraph is truly awesome, all can simply know it, Thanks a lot. I save lot of time and everything work just perfect. Great!
Greg 7 years ago
Leave A Reply